Top 8 Ways to Fix No WiFi after Windows 10 Creators Update
May. 06, 2018 / Updated by Bessie Shaw to Windows 10
No WiFi available is a big headache that many users suffer after the Windows 10 Fall Creators Update 1709 or the Windows 10 Creators Update. The new Windows 10 version brings about many issues like no sound error, 100% disk usage problem, unidentified network issue, etc. as soon as the users complete installing the Windows 10 Fall Creators Update or the Windows 10 Creators Update.
The Windows 10 Creators Update WiFi problem does make the users mad for it is very influential in the continuity of our office work or everyday life. Most of the problems are surfacing on computers that get the Windows 10 Creators Updatefrom old editions like Windows 8.1, 8, or 7 and update directly from old Windows 10 versions.
Such Windows 10 WiFi connection issues include WiFi connected but not web page available, red X/red cross on WiFi icon, Weak WiFi signal and more. Also, your Microsoft Edge can't work properly without the WiFi connection, and the Google Chrome is not available.
What Causes the WiFi Not Working after the Windows 10 Fall Creators Update/Creators Update?
There are many factors that can result in such "no WiFi available on Windows 10 Creators Update" problem. Hardware, network configuration, wireless network card drivers, WiFi router and network account, etc. can affect the WiFi connection on your Windows 10 Fall Creators Update/Creators Update computer.
Today, let's have a close look at how to fix the WiFi not available problem after the Windows 10 Creator Update.
How to Fix No WiFi Available After the Windows 10 Fall Creators Update/Creators Update
In this post, we'll walk you through the top 8 ways to fix the no WiFi on your Windows 10 Fall Creators Update/Creators Update computer. Some of the solutions may take you minutes to hours to fix the problem, and some may require you to be with rich experience and good knowledge on Windows 10 inner working. If you are not sure whether the manual steps work, please skip them and go to the automatic solutions, or just ask your friends who are skillful at Windows for help. Now let's begin.
1. Check WiFi-Related Hardware on Your Computer
It is important to make sure there are zero problems with the wireless network-related hardware. You need to check the hardware first in case you waste time on other useless Windows configurations or operations on your Windows 10 Fall Creators Update/Creators Update PC.
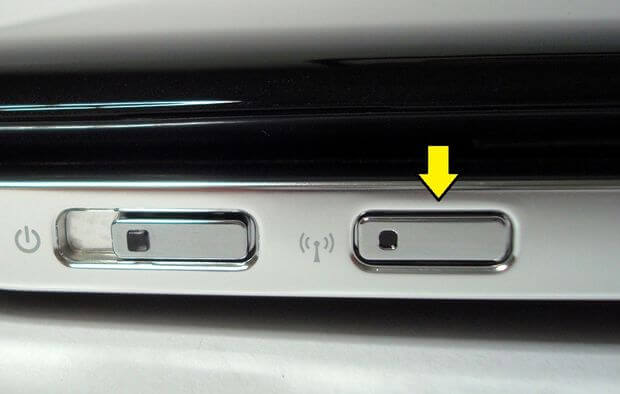
1. Make sure the physical wireless switch button on your laptop is ON.
2. Enable the WiFi feature with function keys like Fn + Fx (x=1,2,3…12).
3. Make sure the WiFi router works properly. Connect your other mobile devices like iPhone, iPad, laptop, etc. to the same WiFi SSID. If all go smoothly, there's no problem with the wireless router.
4. Make sure your computer can connect to other WiFi SSIDs. If it works, that means your wireless network card is in its good condition.
5. Go to the WiFi router configuration panel and enable the 802.11 g mode, which is compatible with other WLAN standards.
2. Re-enter the WiFi Password on the Windows 10 Creators Update PC
The computer running Windows 10 can save the WiFi passwords so that you can directly connect to the network each time without the manual typing. But if you’ve changed the WiFi passwords, Windows 10 still keeps the old ones, thus you’ll suffer the no WiFi available after the Windows 10 Creators Update. Follow the steps below to fix it.
Step 2. Go to the Network & Internet menu.
Step 3. Choose the WiFi tab.
Step 4. On the right side, click the Manage known networks.
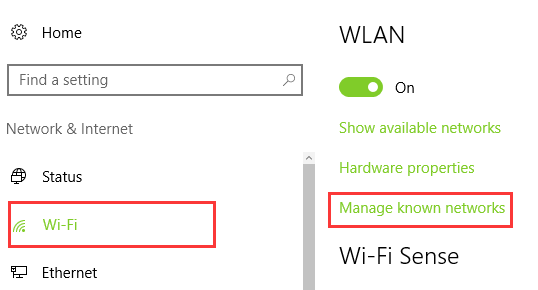
Step 5. Select your wireless SSID and click the Forget button.
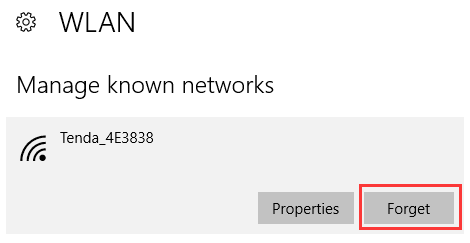
Then you can reconnect to the WiFi with the new passwords via the network icon in the notification area.
3. Reset the IP and Fix the No WiFi Available after the Windows 10 Creators Update
Use the command lines to reset the IP and make the WiFi available on the computer:
Step 1. Right click on the Start button.
Step 2. Select the Command Prompt (Admin).
Step 3. Type into the command line "ipconfig /flushdns" to clean the DNS.

Step 4. Hit the Enter key.
Step 5. Type the command "netsh winsock reset catalog" to reset the Winsock directory.
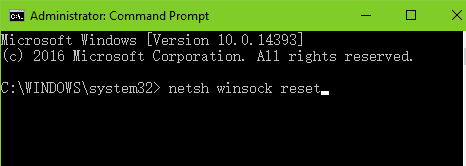
Step 6. Press the Enter.
Step 7. Go on typing into the command "netsh int ip reset" to reset the IP.

Step 8. Press the Enter key.
Now connect to the wireless network again to see if the Windows 10 Creators Update computer can get access to the WiFi network.
These related posts may also interest you:
4. Enable the Wireless Network Adapter and Diagnose the No WiFi Available Problems
Windows 10 Fall Creators Update/Creators Update OS contains a built-in tool that can automatically diagnose and troubleshoot the network errors. You can also use the tool to fix the Windows 10 Creators Update WiFi problem:
Step 2. Select Network connections.
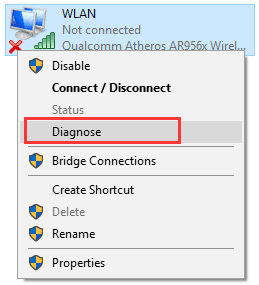
Step 3. Right click the wireless network adapter with a red cross.
Step 4. Select Enable if it is disabled.
Step 5. Select Diagnose from the right-click pane.
Then Windows will diagnose the wireless problem. You can follow the on-screen instructions to fix the issue.
5. Use Troubleshooter to Make WiFi Connection Available on Windows 10 Fall Creators Update
Troubleshooter is a built-in tool on Windows 10 Fall Creators Update/Creators Update. You can easily access to Internet Connection Troubleshooter to fix the no wireless connection issue.
Step 1. Use Win + I to launch the Settings.
Step 2. Go to the Update & security menu.
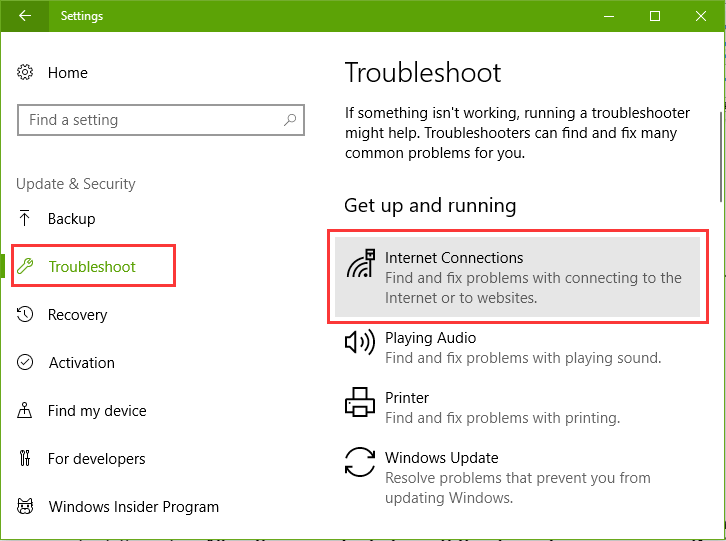
Step 3. Choose the Troubleshoot tab.
Step 4. Click the Internet Connections. Windows 10 will detect Wi-Fi connection issue automatically.
Step 5. Follow the on-screen steps to repair the wireless issue.
6. Fix the No WiFi Issue by Disabling the Power Management
You can also disable the specific option in Power Management of Device Manager to provide more power for the network card on your Windows 10 Fall Creators Update/Creators Update PC.
Step 1. Right click the Start button.
Step 2. Select the Device Manager.
Step 3. Expand Network adapters entry.
Step 4. Navigate to your wireless network adapter and right it.
Step 5. Select Properties.
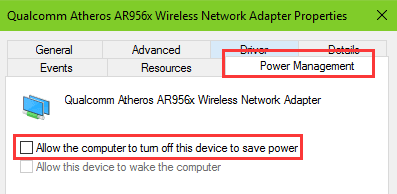
Step 6. Choose the Power Management tab.
Step 7. Uncheck the Allow the computer to turn off this device to save power.
Step 8. Click OK.
7. Repair the Wireless Network Drivers to Fix No WiFi after Windows 10 Fall Creators Update/Creators Update
Outdated or incompatible wireless network drivers can also result in the no WiFi after Windows 10 Creators Update. One workable solution is to repair or update the WiFi drivers. You can use a safe and professional driver download and update utility, like Driver Talent, to help reinstall the best-match network drivers and fix the WiFi connection problem on the Windows 10 Creators Update PC.
3,396,739 people have downloaded it
Click the button above to get the utility on your computer to solve WiFi not working issue.
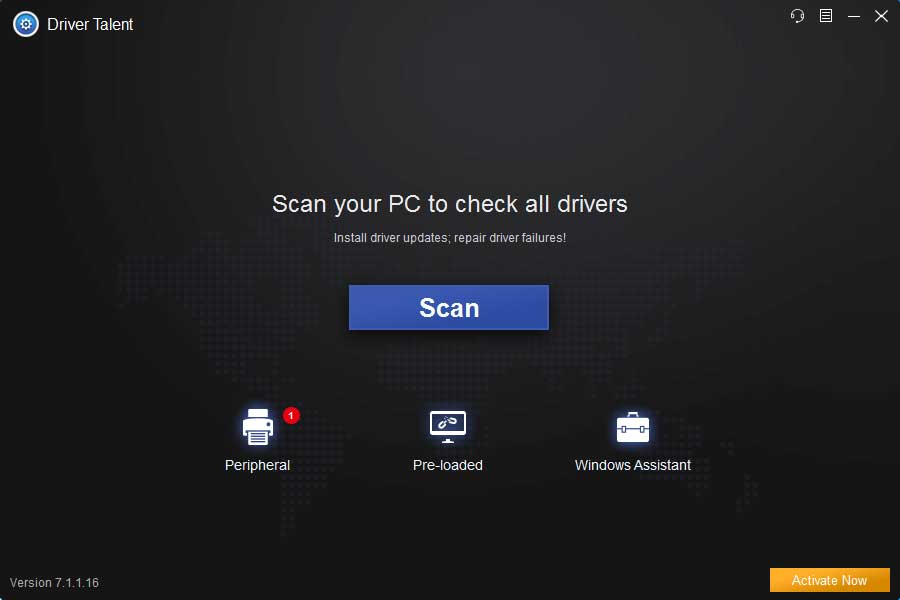
Step 1. Run Driver Talent to scan your computer for all faulty network drivers.
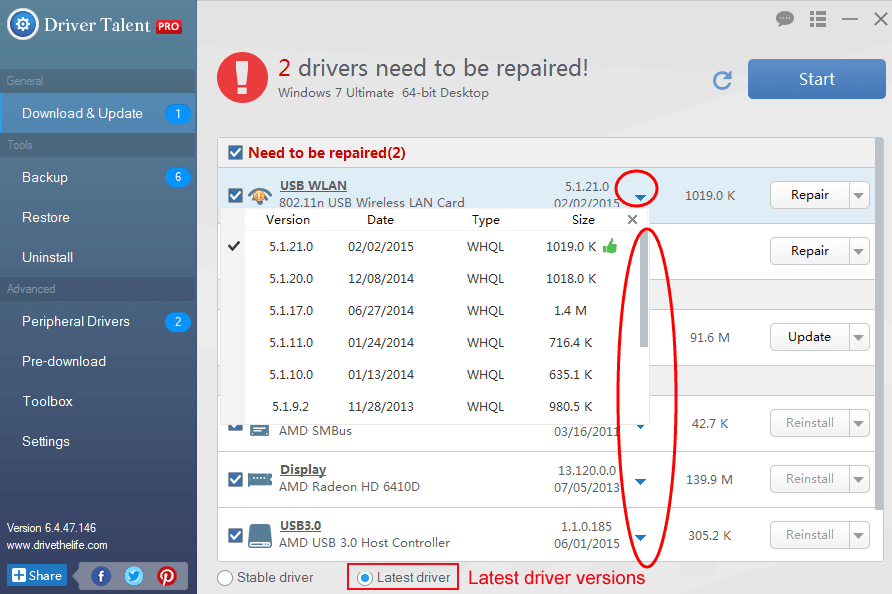
Step 2. Click Repair or Update to download and install the best-match WiFi drivers.
Step 3. Perform a restart to make the driver changes take effect.
Then reconnect to the WiFi to see if the network is available. Note: It is better to backup all the drivers before any changes in case driver crashes or system issues occur.
8. Modify the Registry and Fix the No WiFi Issue after Windows 10 Creators Update
It can't be more careful when you use this method to fix the "no WiFi after Windows 10 update" issue because serious problems might occur if you modify the registry incorrectly. Before you modify the registry, please backup the registry for restoration on your Windows 10 Fall Creators Update/Creators Update PC in case problems occur like slow boot, Windows 10 INACCESSIBLE_BOOT_DEVICE error, ghost touch screen, etc.
Note: It is the last but not the recommended workaround. If you know little about Windows registry it is better to apply the methods above or turn to computer experts for help.
Step 1. Right click the Start button.
Step 2. Select Command Prompt (Admin).
Step 3. Type the following command lines "reg delete HKCR\CLSID\{988248f3-a1ad-49bf-9170-676cbbc36ba3} /va /f".

Step 4. Hit the Enter key.
Step 5. Type the command "netcfg -v -u dni_dne".
Step 6. Press the Enter key.
Step 7. Restart the computer.
These related posts may also interest you:
Now you have a new list of all the available WiFi networks within range. Connect to your wireless network and enjoy yourself.
That's it. Thank you for visiting this post. If you fail to fix the WiFi problem with the methods above, you can click the LEFT MENU on this page for more technical support. If you know other ways to fix the no WiFi available issue after the Windows 10 Creators Update, please share with us in the comments section below. Any other Windows 10-related issues, see Windows 10 section on this site or go to our blog.

Comments
windows 10 no internet access but connected