Depth of Field Simplified
Depth of field (DOF) is probably one of the least understood principles of photography. Most photographers seem aware of its existence, but few seem able to define exactly how it works and how to put it to use. We believe that part of the reason for this is because it is completely fluid, (meaning constantly changing) element of the photographic process. It has no set parameter, so it is more difficult to define. It’s easy to define an f/stop, or a shutter speed, because once you set your camera it stays put. But, as a photographer, if you take so much as one step closer to your subject: the DOF has changed.
Here is a definition of Depth of Field-
In optics, particularly as it relates to film and photography, depth of field (DOF) is the distance between the nearest and farthest objects in a scene that appear acceptably sharp in an image. Although a lens can precisely focus at only one distance at a time, the decrease in sharpness is gradual on each side of the focused distance, so that within the DOF, the unsharpness is imperceptible under normal viewing conditions. Courtesy of Wikipedia
There are formulas and technical data as relates to DOF, but because this article is titled, Depth of Field Simplified, we are going to forego all that. It’s not necessary for the average photographer to know those formulas to put DOF to work in their photography. Over the years camera, and lens, manufacturers have tried to make DOF easier for the photographer. They have done this by incorporating such things as a depth of field preview button on the camera body, and/or, a depth of field scale on the lens barrel. While these are somewhat helpful, they were always cumbersome to use, and they have disappeared on all but a few camera/lens models available today.
The good news is that you don’t need those crutches to put DOF to use.
Let’s talk about what DOF is, what changes it, and how the average photographer can make use of it.
Try to think of depth of field as a window: a window of “focus” opportunity.
What is that window of opportunity? It’s your opportunity to choose how much of your photograph will be in focus.
These Elements affect the Fluid Nature of Depth of Field
- The focal length of the lens
- The f/stop of the lens
- The camera to subject distance
Here are the few simple things you need to know to begin putting DOF to work for you.
The Focal Length of the Lens
A shorter focal length lens (wider angle) will have more depth of field at a given f/stop than a normal or telephoto lens. So, remember this- the longer the focal length of your lens, the less depth of field you will have at a given f/stop.
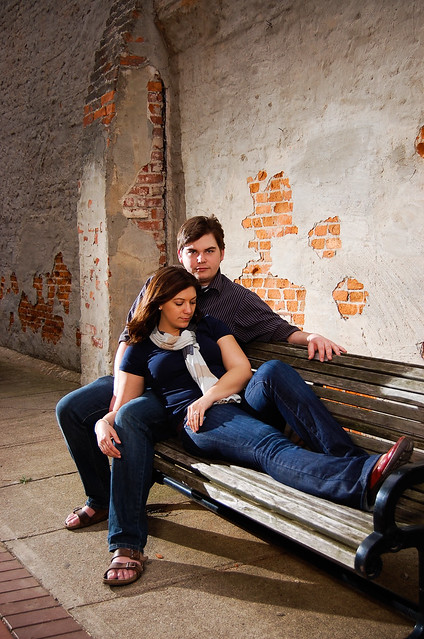
Let’s put this into a real world situation. You’re going to take a portrait of two people seated in front of a brick wall. You would like to depict the couple from head to toe, while also seeing the brick wall behind them, and you would like the entire scene to be in focus. Lighting conditions have determined your exposure will be 1/125th at F/8.0. You have room to move around so you can frame your subject in exactly the same manner no matter what lens you use.
You start with a moderate telephoto lens of 135mm. Your test shot looks good, with the exception that the people begin to fall out of focus and the brick wall is way out of focus. You change your lens to a 55mm. The people are now completely in focus, but the brick wall is only somewhat in focus. You change your lens again to a 28mm. Now everything is in complete focus. You take your photograph. Congratulations, you’ve just made a creative decision about depth of field based on the focal length of your lens!
The F/stop of Your Lens
This is a primary decision when trying to take control of your depth of field. This is the simple thing you need to know. The larger (more open) your aperture, the smaller your window of focus will be. Conversely, the smaller (more closed) your aperture, the larger your window of focus will be.
Look at the f/stops on your camera and/or lens. F/2.8 (an example as this various by camera and lens) is a large aperture, (wide open/ small window of focus). F/22 (again an example as this varies by camera and lens) is a small aperture (more closed/ larger window of focus).
Let’s put the f/stop decision to a real world test. You would like to take a photograph of a stack of coins. Your lens is determined because you must use your macro lens. Your lens to subject distance is determined because you want to fill your frame with the coins. There is not a lot of light so you take your first test shot at F/2.8.
Your exposure looks good so you make some camera adjustments and go to F/8.0.
This helped, but you would like a little more “window of focus” on the coins. You make some more exposure adjustments and go to F/32.0
Congratulations, you have just made a creative decision based on DOF and your use of an f/stop.
The Camera to Subject Distance
If you’ve never bothered to closely examine the distance scale on your lens, we would like you to take a moment and do that.
Did you notice how the distance marks become closer together as the focusing ring is rotated toward infinity? There are optical formulas and reasons for this, but again, for this article on, Depth of Field Simplified, we want you to grasp one simple concept-
When you focus on your subject, the further your subject is from the focal plane (sensor) of your camera the more depth of field you will have using the same f/stop and lens.
Let’s put the subject to focal plane choice to a real world test. You would like to photograph three toys soldiers in a row, and you would like them all to be in focus. But you have one lens to work with and limited lighting so the smallest f/stop (biggest window) you can use is F/8.0.
So, you take your photograph and no matter which soldier you focus on, the other soldiers are out of focus. What do you do? Take several steps back… This will shift your subject to focal plane distance closer to the infinity end of your focusing ring. And that… will give you more depth of field using the same lens at the same F/stop.
Once you’ve found the right distance from your subject, (subject to focal plane distance that keeps all three soldiers in focus) take your photograph. Then in post, crop it back to your original framing.
This, by the way, is the biggest advantage of higher megapixel cameras.
One Final Tip
Many photographers (even experienced ones) are often not aware of this aspect of depth of field. The window of focus does not occur evenly in front of, and behind, your focal point. Approximately 1/3 of the DOF window will occur in front of your focal point and 2/3 will occur behind your focal point.
This is why the earliest portrait photographers learned to focus on their subjects eyes. The 1/3 DOF window in front of the eyes kept the nose in focus, and the 2/3 DOF window behind the eyes kept the head in focus. This is why if you inadvertently focus on someone’s ear while taking their portrait, their face will be mostly out of focus; it is outside the DOF window.
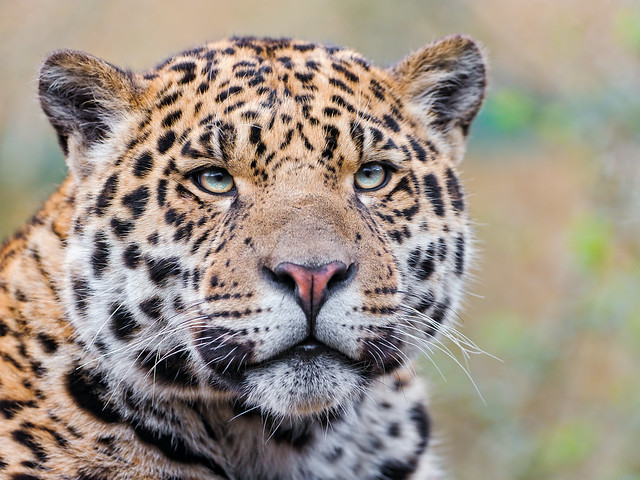
This head shot of a young jaguar is an excellent example of the 1/3 in front, 2/3 in back rule. If you examine this photograph closely, you will see that the point of focus is on the bridge of the nose between the eyes. This POF, slightly forward of the eyes, kept the tip of the cat’s nose in focus. The 2/3 behind was enough to keep the left ear in focus while the right ear is already going soft. The background is completely out of focus. This is an excellent use of the DOF window- as all the important elements are in focus.
We hope that these simple tips have helped you understand depth of field and how you might now be able to put to work for you in your own photography!
Click Here: Depth of Field Simplified


Comments